HARDIK PATEL BLOGGER TIPS

Saturday, May 3, 2014

HOW TO IMPROVE YOUR BLOG/WEBSITE GOOGLE RANKING


HOW TO  IMPROVE YOUR BLOG/WEBSITE GOOGLE RANKING


Google's search engine, www.google.com, uses a variety of methods to determine which pages are displayed first in the results. Their exact formula is a secret, but there are a few things you can do to improve your positioning. The term for this is Search Engine Optimization (SEO).
These tips may not make your website the first one to appear in the list, but they just may help you move up a little. No matter what you do, make sure you make a site that you want to visit. If you're gaming the system, sooner or later Google will figure it out and change their formula. You'll end up plummeting in the search results and wonder why.
Ignore spam and websites that offer to submit your website to hundreds of search engines. At best these are wastes of time or money and at worst they can actually hurt your ranking.

    Keyword Phrases

Rather than focusing on a single word, try adding a few words to make a keyword phrase. You may want to read about effective Google searches to see how keyword phrases help with searches. Don't overdo it. If it looks spammy, it probably is.
If you were searching for your own website, what keyword phrase would you type into Google for each page? Would you look forsuper fast widgets? Would you look for cooking with widgets? It may be helpful to get a different perspective. Ask someone else to read your page and suggest what they think your keyword phrase might be. You can also check Google Trends to see if one phrase is starting to gain popularity.
Try to stick to one subject per page, and stick to one keyword phrase per page. That doesn't mean you should write stilted text or use odd phrases. Clear writing is both easier to search and easier to read.

  Density

One of the things Google looks for when it catalogs pages is the density of the keyword usage. In other words, how often the keyword occurs. Use natural phrasing. Don't try to trick the search engine by repeating the same word over and over or making text "invisible." It doesn't work. In fact, some of that behavior even get your website banned. Read more: Google Dont's - Bad Tips and Dirty Tricks That Will Get You Banned.
Give a strong opening paragraph that says what your page is actually about. This is just good practice, but it may help search engines find your page, too.

  Name Your Pages
Give your pages a descriptive name with the <title> attribute. This is vital. Google displays search results as a link using the Web page's title. A link called 'untitled' isn't enticing, and nobody is going to click on it. When appropriate, use the page's keyword phrase in the title.
Learn more about why titles matter.

 Link Early, Link Often


One of the biggest factors Google looks at is the hyperlink. Google looks at both links to and from your website.
Google looks at the words you use in links to help determine the content of your page. Use links within web pages as a way to emphasize keywords. Rather than saying, "click here to learn more about SEO" you should say: Read more about SEO (Search Engine Optimization).
Links from other websites to your website are used to determine PageRank.
You can improve your PageRank by exchanging text links with other relevant websites. Banner exchanges are not as effective, and pages that want to charge you for this service, are probably already known spammers.
  Social Networking


Social networking sites can be a good way to promote a site, but most will not affect your rank directly. Google+ promotion may be an exception.
Make Your Graphics Search Friendly
Keep the Flash to a minimum. People may enjoy reading Flash, but search engines tend to skip right over it. It's also bad for phone traffic.
Give your images <alt> attributes. Not only does it make your website more accessible to the visually impaired, it also gives you another chance to place your keywords where Google can see them.


  Good Design Is Popular Design


In the end, strong, well organized pages are pages that Google tends to rank higher. They're also pages that tend to become more popular, which means Google will rank them even higher. Keep good design in mind as you go, and much of the SEO will design itself.

                                   Hope you will like this post.


HOW TO MAXMIZEYOUR BLOG TRAFFIC

 HOW TO MAXMIZE BLOG TRAFFIC:-


HERE IS SOME TIPS FOR GETTING GOOD TRAFFIC TO YOUR BLOG IN A SMALL OF TIME.

                              
1.SOCIAL MEDIA:-

SOCIAL NETWORKING ARE VERY IMPORTANT SOURCE OF INTERNET TRAFFIC.TRY TO INCREASE YOUR FANS AND FOLLOWERS ON POPULAR SOCIALNETWORKING SITES LIKE FACEBOOK,TWITTER,GOOGLE+,LINKEDIN AND PINTEREST.
IF YOU HAVE LARGE NUMBER OF FOLLOWERS AND YOU HAVE ACTIVE THEN YOU CAN EASILY DRIVE GOOD AMOUNT OF TRAFFIC TO YOUR BLOG FROM THEM.SHARE YOUR BLOG POSTS ON THESE SOCIAL NETWORKING WEBSITES TO GAIN TRAFFIC BENIFITS.
SUBMIT CONTENT TO YOUR SOCIAL NETWORKS MANUALLY.DONOT USE ANY SOFTWARE FOR SUBMAITTING THE CONTENT.THIS WILL INCREASE YOUR ENGAGEMENT WITH YOUR SOCIAL CONNECTIONS.
USE SHARE BUTTONS ON YOUR BLOG SO THAT YOU BLOG VISITORS CAN DIRECTLY SHARE CONTENT FROM YOUR BLOG TO THEIR SOCIAL NETWORKS .THIS WILL GIVE YOU TRAFFIC BONUS.

2.GUEST POSTING:

GUEST POSTING IS ALSO VERY POWERFUL WAY OF INCREASING YOUR BLOG TRAFFIC IN SHORT PERIOD OF TIME.YOU MUST PUBLISH GUEST POSTS ON WELL ESTABLISHED BLOGS OF SIMILAR NICHE.ANOTHER BENIFIT OF GUEST POSTING IS THAT YOUR BLOG WILL ALSO GET ONE OR TWO DO FOLLOW BACKLINKS WHICH RESULTS IN INCEASING GOOGLE PAGE RANK OF YOUR BLOG
ONLY PUBLISH GUEST POSTS ON GOOD BLOGS DO NOT WASTE YOUR TIME ON SMALL BLOGS .BECAUSE A SINGLE POST ON WELL ESTABLISHED TRAFFIC AND EXPOSURE SMALL BLOG
PUBLISH AT LEAST TWO BLOG GUEST POSTS PER WEEK.ONLY PUBLISH ORIGINAL ARTICLE.ADD IMPORTANTS WIDGETS TO BLOG.ALL WIDGETS WILL NOT DRIVE TRAFFIC TO YOUR BLOG BUT THERE ARE SOME IMP WIDGETS LIKE SHARE BUTTON, FACEBOOK LIKE BOX  ,TWITTER FOLLOWERS BUTTON WHICH HELPS IN DRIVING TRAFFIC TO YOUR BLOG.
WRITE POSTS WITH MORE THAN 300 WORDS .
POSTS UNDER 300 WORDS HAVE LITTLE CHANCE TO AMONG THE TOP RESULTS

3.USE THE KEYWORD IN H2 TAGS:-

YOU MUST ALSO HEADING TAGS(H2,H3) IN YOUR POSTS IN THIS POST I AM  USING THE KEYWORD LIKE’’ HOW TO MAXIMIZE YOUR BLOG TRAFFIC’’ IN H2 HEADER TAGS.DO THIS ALWAYS BECAUSE IT ALSO HELPS TO BECOME WELL POSTIONED IN SEARCH RESULTS .IF YOU DO NOT KNOW ABOUT HEADER TAG  I WOULD SUGGEST TO DO A FURTHER SEARCH ON THIS SUBJECTS.

                                   
                    HOPE YOU LIKE THIS POST.


Friday, May 2, 2014

HOW TO ADD STAYLISH TEXT BOX/BORDER IN BLOGGER POST


HOW TO ADDD STAYLISH TEXT BOX IN BLOG POST ?

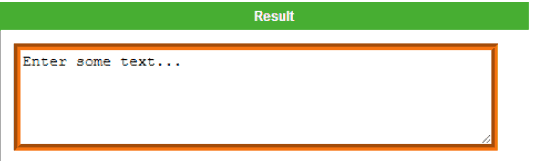
TODAY I AM POSTING ABOUT THE TEXT BORDER OR BOX .TEXT BORDER AND BOX IS VERY IMPORTANT PARTS OF BLOGGER POST.THIS BOX MAKE THE TEXT STAYLISH LOOK . HERE IS SOME EXAMPLES OF HTML TEXT BOX WITH HTML CODE .ADD THIS HTML CODE TO YOUR BLOG POST .


 1.HTML COLOR BOX WITH COLOR BORDER :-( HTML CODE)

<!-- Codes by HTML.am -->
<form action="http://www.html.am/html-codes/textboxes/submitted.cfm">
<textarea name="myTextBox" cols="50" rows="5" style="border:6px groove #F7730E;">
Enter some text...
</textarea>


BELOW IS EXAMPLES OF CODE:-


 2.SIMPLE RED BORDER  HTML BOX:- ( HTML CODE)

<!-- Codes by HTML.am -->
<form action="http://www.html.am/html-codes/textboxes/submitted.cfm">
<textarea name="myTextBox" cols="50" rows="5" style="border:3px dotted #F7730E;">
Enter some text...
</textarea>


BELOW IS EXAMPLES OF CODE:- ( HTML CODE)


 3.SIMPALE HTML BOX
<!-- Codes by HARDIK PATEL-->
<textarea name="myTextBox" cols="50" rows="5">
This textbox has been given a name of "myTextBox". This can be used by any script that process the contents of this textbox (once it's been submitted to the server).
</textarea>

BELOW IS EXQAMPLES OF CODE:-


 4. HTMLTEXT  BOX  WITH BACKGROUND BOX:-

<!-- Codes by HARDIK PATEL -->
<form action="http://www.html.am/html-codes/textboxes/submitted.cfm">
<textarea name="myTextBox" cols="50" rows="5" style="background-color:#FCF5D8;">
Enter some text...
</textarea>
<br />


BELOW IS EXAMPLE OF HTML CODE NO 4


Thursday, May 1, 2014

HOW TO ADD DROP DOWN MENUBAR IN BLOGGER


   HOW TO ADD DROP DOWN MENUBAR IN BLOGGER


    DROP DOWN MENU ARE VERY USEFUL IN BLOGGER.TODAY I AM POSTING HOW TO ADD DROP DOWN MENU BAR IN BLOGGER.BELOW IS THE STEPS TO MAKE DROP DOWN MENU.

STEP 1

GO TO BLOGGER ACCOUNT


STEP 2

GO TO TAMPLATE THEN EDIT HTML

STEP 3

FIND   ]]></b:skin> AND PASTE BELOW CODE BEFORE   ]]></b:skin>


STEP 4

NOW GO TO LAYOUT AND ADD BELOW  GADGET CODE


STEP 4


SAVE TAMPLATE

STEP 5 

NOW GO TO LAYOUT AND ADD BELOW  GADGET CODE


NOTE:- ADD YOUR PAGE LINKS TO  #


Saturday, April 26, 2014

HOW TO ADD META TAGS IN BLOGGER


   HOW TO  ADD  META TAGS IN BLOGGER


go, next icon  Meta elements are tags used in HTML or XHTML documents to provide structured metadata about a Web page. They are part of a web page's head section. Multiple Meta elements with different attributes can be used on the same page. Meta elements can be used to specify page description, keywords and any other metadata not provided through the other head elements and attributes.Meta tag is very important in blogger for search engines.meta tag will improve your blogger traffic .here is a step how to add meta tags in blogger

step 1

Go to blogger account


step 2

Go to section  Template and then  edit html
press ctrl+f searchfor < head> Add following code  after <head> section


<meta content='Your Blog Description' name='description'/>

<meta content='Keyword1,Keyword2,Keyword3' name='keywords'/>

<meta content='Author Name' name='Author'/>

<meta content='Author Email Address' name='Email'/>

<meta content='all' name='robots'/>

 <meta content='index, follow' name='robots'/>

<meta content='Language Name' name='language'/>

<meta content='Country Name' name='country'/>

NOTE:-Remove Red Text With Your text .

step 3

sava template


Friday, April 25, 2014

STAYLISH FACEBOOK FOLLOW US WIDGETS WITH RUNNING BUS FOR BLOGGER

STAYLISH  FACEBOOK FOLLOW US WIDGETS WITH  RUNNING  BUS FOR BLOGGER  

TODAY I AM POSTING ON HOW TO MAKE FACEBOOK FOLLOW US WITH STAYLISH BUS RUNNING IN YOUR BLOG.YOU HAVE SEEN MY BLOG THERE YOU WILL FIND THIS STAYLISH BUS.


HOW TO ADD TO YOUR BLOG


STEP 1

GO TO BLOGGER ACCOUNT( AS GIVEN BELOW PICTURE)


STEP 2

GO TO LAYOUT


STEP 3

ADD GADGET (AS GIVEN BELOW BOX)
IN HTML /JAVA SCRIPT ADD BELOW BOX  CODE


NOTE:- REMOVE RED FACEBOOK PAGE WITH YOUR PAGE


 THAT'S IT YOU HAVE ADDED THIS STAYLISH BUS GADGETS TO YOUR BLOG 

Thursday, April 24, 2014

How to Add Border Between Sidebar widgets


How to add border between sidebar widgets


Ever wanted to have a separation between your sidebar widgets, like a dotted line, etc. 

Well, look to this blog sidebar and you'll see that I just added a dotted line. 

Now let me tell you how to do this: 

Copy the code below:
.sidebar .widget {
border-bottom: 2px dotted #000000;
margin:0 0 1.5em;
padding:0 0 1.5em;
}


Now, I'm going to tell you how to change this up to your preferences, but first let's get the code into your CSS box.

STEP 1


Go to Layout>Customize>Advanced>Add CSS. Click on Add CSS. Now I don't know about you, but I have quite a bit of stuff already in that box, so I go down to the bottom and get my cursor several lines below the last bit of code. One way to do this is to put your cursor at the end of the last word and hit Enter. Add the code and Save.

What I added to mine was a 2 pixel dotted black line (black is #000000). I imagine you could put solid if you didn't want dotted, but I didn't try that. That's really the only line, the second line, that you need to mess with.

I have either learned or written down in a blog tips notebook what color hex codes I prefer. Go here to pick out a color you like. It would be smart to do this before you add the code. Or you could add the code, Save, and then come back and change it.

When you get to this website, mine is likely set to red shades, so look to the left and pick any color you want and then go through the various shades. Write down the hex code you like. It is # and six letters/numbers.

Now you want to figure out how thick you want your separator to be. I put mine at 2 pixels. Play with it till you get it where you like it. Then click Save.

That's it!

{Note: I got this CSS code to work on this blog, but not Color My Decor. I am looking for a fix. So if this code does not work for you, I will be trying to figure out why. Let me know if it does not please.} 

Previous Page Next Page Home